How to Start a Blog
Here I am sitting on my front porch with a glass of sweet tea typing away on my laptop in the middle of a workday. No, this isn’t me dreaming. For so long this was my dream of how I wanted to work…Now it’s finally a reality!
Yes! I took a leap of faith and decided to stop daydreaming and start doing! After far too many years of working 70+ hours a week (yes, I am a workaholic) for someone else’s dream, I started working for MYSELF!
And before you ask, this isn’t a get rich quick scheme nor is it a job I only work 10 hours per week. I am now a full-time blogger – which is crazy hard but totally worth it! And just so you know (full disclosure here), I am working at least 10 or 12 hours a day 7 days a week. BUT…I am working from home or at the park or sitting on the dock by the river!
So as I continue on my journey, I thought it was time I share with you how to start a blog and show you how it can be done in 15 minutes or less!
(This post may contain affiliate links. What does that mean to you? Well, if you click on a product and make a purchase, I may receive some compensation at NO charge to you. If you want to read the boring stuff, my full disclosure can be found here.)
I want you to know if this is your DREAM, it is easy to start and become a blogger! Really! It takes less than 15 minutes to set up a WordPress blog! So grab your laptop and a glass of sweet tea (or wine-yes, wine is always a good choice) and follow my lead. Let’s get your blog up and rolling!
If you are still on the fence and want even more information on blogging, check out these posts:
6 Secrets Successful Bloggers Don’t Share
7 Tips You Need to Follow for a Killer Blog Post
How to Start a Blog and Become a Blogger in 15 minutes or less!
Step 1 — Choosing Your Domain Name
Okay! Brace yourself because this is the hardest part of setting up your blog! It really is!
Deciding on the perfect a name is a tough decision. If you are like me and are learning everything you can about blogging, you have probably heard to pick a name that coincides with your niche (your blog topic), but that isn’t entirely true.
Ok…I know I just went against about 98% of the blogging courses out there. But people will visit your blog for YOU and your VOICE! Yes, that’s right! They will read your posts and come back for you, not because of your domain name.
Now grab a pen and paper (I’m old school when it comes to brainstorming) and set a two-minute timer on your phone and take a sip of wine.
READY…SET…GO! Write down every possible name that pops into your mind. Don’t hold back. Let your creativity shine! Just remember to think simple, catchy, and easy to spell.
Now that your time is up, sit back and take a look at your list. Do you see a name that jumps out at you? What are your favorites? Let’s see if any of these are available.
PRO TIPS:
- Stick with a {dot} com simply because that is what most people assume when you say website. You also don’t want to compete with other variations of the same name when you are trying to build your traffic.
- Verify your name is available on social media options. This is important when promoting your blog.
Here is a great website that you can check to see if your domain name is free and its availability on social media. Just head over to Namecheckr and do a quick search.
Step 2 – Get Web Hosting
You have a domain name, now it’s time to pick hosting. This is a necessity when going with WordPress.org.
If you are asking “what is hosting?”…I’ll give you a simple explanation. Your host is where your blog lives. It houses all of your files and is full of technical features that are way above my head. But choosing a good hosting company is important.
I use and suggest LYRICAL HOST and here’s why…
If you are shopping around and see the prices of hosts, you might find some that are lower priced than Lyrical Host…but this is for the first year ONLY! With Lyrical Host, you will never have additional fees or surprise price hikes.
Even with the smallest package, Lyrical Host gives you premium services and unprecedented customer service! I promise I put that customer service statement to the test. Everyone at Lyrical has been so helpful!
And y’all what they offer can’t be beat! Lyrical Host gives you everything you need…absolutely NO UPSALES! You will receive free SSL certificates, email addresses, daily backups (and we all know how important this is!), and so much more.
I read of all of these “cheap” options for hosting. Then BAM! At the time of renewal, you are hit with an astronomical price. You never have to worry about this with Lyrical Host.
I migrated to Lyrical Host from another host and it was PAINLESS. They handled everything for me without downtime on my blog!
And just so you know, they offer monthly, semi-annual, and annual plans. If you are unsure, there is no fear of long-term commitment.
I could go on and on about everything Lyrical Host offers, but you should really read it all for yourself. I am so happy that I took this leap on the encouragement of a “bigger” blogger.
And the best part is that I have a special deal with Lyrical Host and have a super special code to get you 10% off your first package! Just use the code of SOUTHYALL10 and you get your discount!
Click here if you are interested in learning more about Lyrical Host!
Step 3 – WordPress!!!
Now that you have a host, you will need to install WordPress. What is WordPress? It is a software that allows you to create blogs, like this one, with typing and by using a drag and drop system.
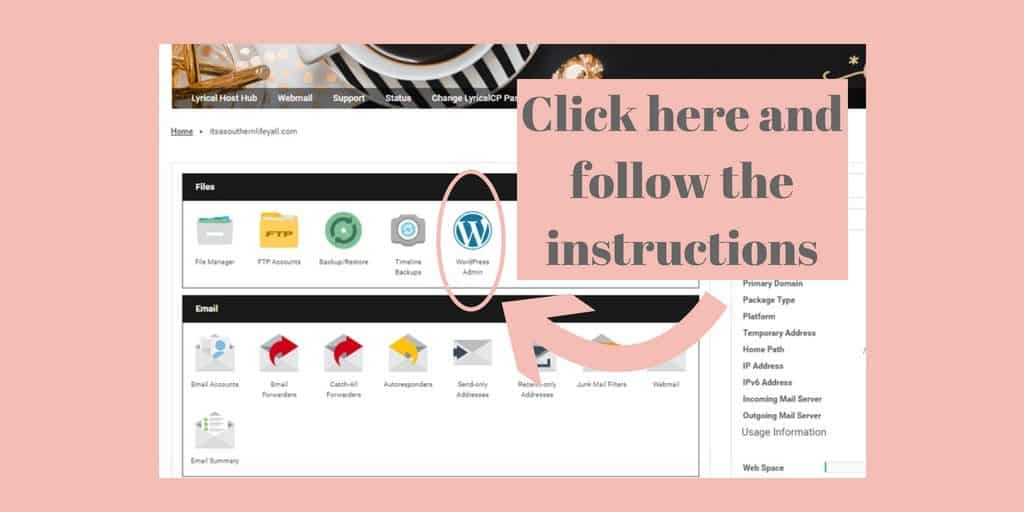
Installing WordPress with Lyrical Host is very simple…it comes loaded for you when you choose a WordPress option. When you log into your control panel for the first time, just click where I have circled and follow the steps that follow. But if you have issues, contact Lyrical’s customer service. Did I mention their outstanding customer support??? 🙂
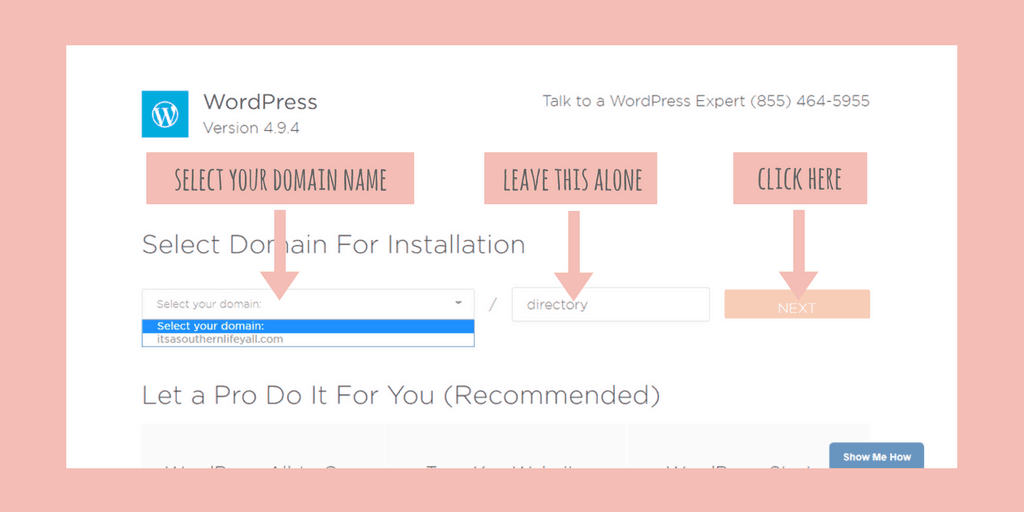
Now you will be prompted to select your domain name from the drop-down menu. Although WordPress suggests having a Pro do it for you, it is really unnecessary because at this point you are almost there!
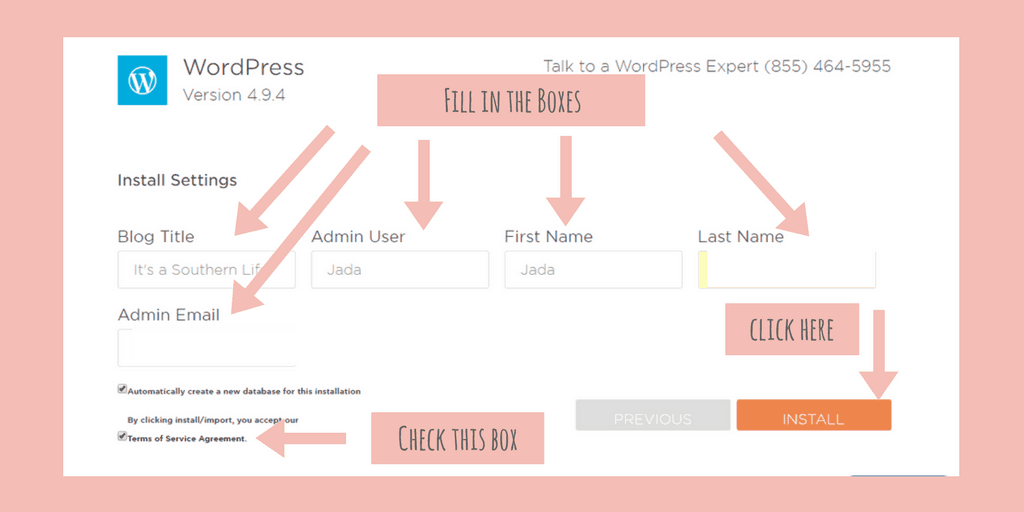
You are in the home stretch now! Fill in these final boxes and check the Terms and Conditions box, then click install!
Step 4 – Say Hello to the Blogging World!
That’s it! Wasn’t it easy?!
Now check your email (you know the one you entered in the last step) because you will receive all of your login credentials there.
Let’s head on over to your admin URL. In your web browser type in the domain name you selected followed by {dot} com with /wp-admin (yourdomainname.com/wp-admin) and enter the information from your email.
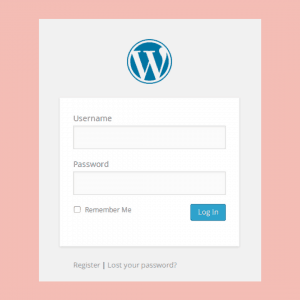
Congratulations! You are now the newest blogger in the land! There is no stopping you now!
If you have any questions, I am here.
xo ~ Jada




Leave a Reply